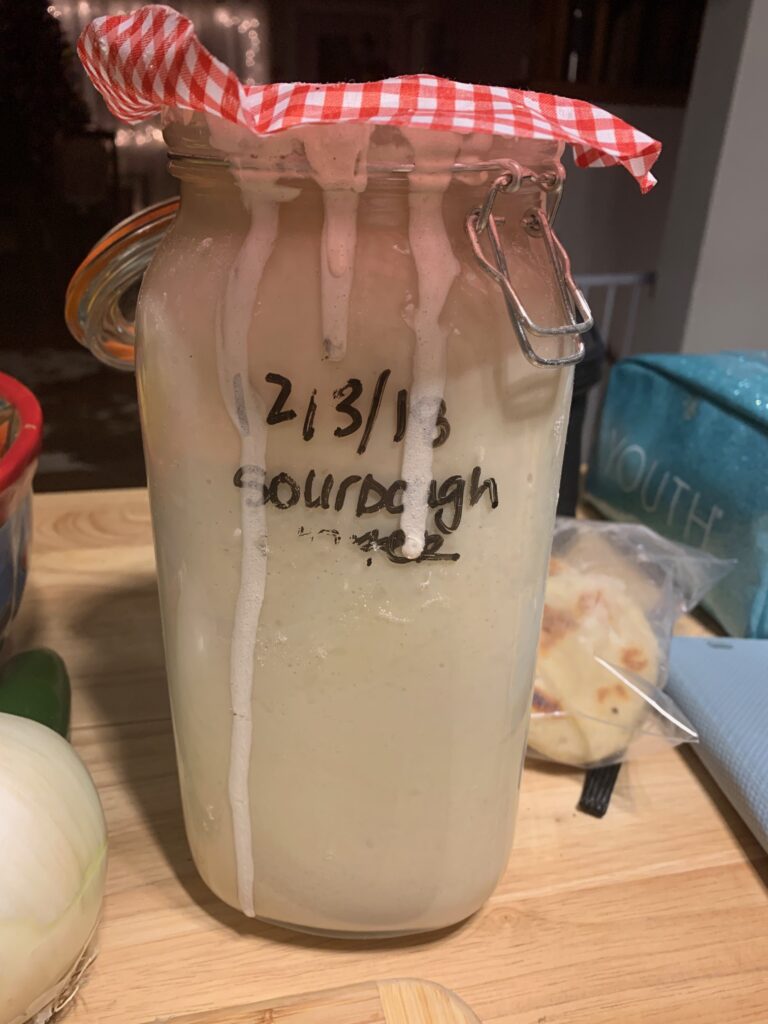
This is by far the best sourdough starter recipe and prep plan that I have found on the internet. I made this for the first time in December of 2018 and it literally lasted in my fridge until this past month (January 2023) when I had to throw it away. I blame it on the back of my fridge being too deep and me forgetting about it, along with the fact that the gluten free flour really just doesn’t keep the starter growing like the real wheat based flour did. But, it did last for 2 years being GF so I call that a win!
I also have dried flakes of the real gluten based flour starter that I started in 2018 in a mason jar in my cupboard, so when and if my fam bam can begin enjoying gluten again I plan on restarting.
I have made some of the best tasting recipes that I have ever enjoyed from home-based baking with this starter – and I will admit I did it before the sourdough craze of the pandemic, so I am a little bit proud of that “originality”. Hence, why I am calling this the best sourdough starter recipe out there, and bonus, its dairy free!
We decided to give the sourdough a go when my family went dairy and egg free for my sons allergies back in 2018, during our food elimination diet. We were really struggling to find any store bought breads that omitted both and that tasted good – if only I knew how triply difficult this would be once we eliminated gluten but were allowed to work back in eggs. It’s been pretty much impossible.
However, I have never been more thankful for the diet fad of Keto, with the amount of food allergies that my family has had. While I am absolutely NOT comparing being on a diet to having real, actual food allergies, it has opened up the more popular brands to having a much larger variety of allergen-friendly foods that are now available in more main stream stores and not only at fancy over priced health food stores. So, way to go keto people. I think the other bigger change has been not only the more robust knowledge that our specialists are having around food allergies, breastfeeding, and symptoms, but also the deeper under standing of more severe allergies like Celiac. We have not yet tested for celiac, but I would not be surprised if it ends up being that both of my boys have it. We will see!
Okay, so back to Sourdough. The most amazing fridge-storable (if you are more lazy) otherwise counter friendly (if you feed it daily) invention since, well, sliced bread! Ha – excuse the Dad joke but I could not help myself.
Some of my favorite recipes that I have made and will have posts about on this blog are:
- The best english muffins you will ever have – I kid you not, you will never buy store bought again
- The best pizza dough you will ever eat, if you love fluffy, large crust that is absolutely delectable
- Amazing breads in all forms. My favorite is the most basic, that you make in a dutch oven.
- Sourdough Bagels – YUM! Hello New York City bakeries. Watch out for this home cooked version.
I won’t lie -if you want good sourdough, you have to work at it. It takes a lot of love and it can very easily go moldy if you, like me, after 5 years forget about it in the back of your fridge for too long. But, you can keep it going for a long long time. I swear, families pass this stuff down in their will. People covet a good sourdough starter, so if you have one, you might draw a crowd 🙂
INGREDIENTS
What you need before you begin- The entire process of growing your starter takes about 10 days, so plan to have multiple bags of flour on hand when you start to accommodate this daily process until you get a good base:
- A mason jar with lid. Depending on how much you want have on hand at one time, will determine the size of the jar that you choose. When I did it pre-GF dough, and was easily making a loaf or two per week, I used a large one like this one from Target.
- When I switched to GF dough and was making things a lot less often, I switched to a smaller jar like this one from Walmart
- Cheese cloth or light lid for when you have it on your counter top and are “feeding” your sourdough daily
- Favorite Flour of Choice
- For both types of flour, Gluten Free or regular, my favorite by far is King Arthur’s selection.
- Whole Wheat Flour to start the starter – you only need 1/2 cup of this and then you switch to white/regular unbleached flour, so if you already have some on hand, use this
- Regular Flour
- Gluten Free (Please keep in mind, I have never used GF to start the starter from scratch, so I can’t give advice on this)
- For both types of flour, Gluten Free or regular, my favorite by far is King Arthur’s selection.
- Filtered Water (brita or filtered tap will do)
- Wooden spoon or spatula for stirring
- Patience and Reminders on your phone so you don’t let your starter die
RULES OF ENGAGEMENT
So, what is sourdough starter anyway and what is it for? Well, its really fermented yeast that you are making at home to replace store bought yeast. You literally will never need store bought yeast again if you have a healthy, active starter. You know that its ready to start using after it has literally started to bubble and has doubled in size. You will be able to smell it, it smells well, a little sour. You start with the whole wheat flour because it has the right ratio of ingredients to jumpstart the fermentation – then you will feed it with the white flour each day thereafter. So, if you don’t need to go out and buy a whole new thing of whole wheat, just use what you have on hand.
I don’t remember who taught me this or where I read it, or what Grandmother convinced me, but I have been told to NEVER use a metal spoon or fork with your sourdough. Have you heard this too? I can’t really explain it, but I am sure if you looked it up there is some science behind it. So, I have stuck to this tried and true and only use a wood spoon, spatula, or mixing utensil when I am stirring my starter.
INSTRUCTIONS
The key here to remember is this ratio: 1/2 cup of flour to 1/4 cup of filtered warm (not hot) water daily.
Day 1: Kick off!
Start with your 1/2 cup of Whole wheat flour and 1/4 cup off of filtered warm water on day one and mix it in your mason jar directly. You are going to stir with your wooden utensil until completely smooth and all big lumps are out. You then cover with the cheese cloth over the lid and you can close the lid on the jar but don’t lock it, or better yet leave it open for now. You are going to let it rest in a warm spot on your counter for 24 hours. Pick a spot that is room temp or about 70 degrees F.
Day 2: Got Bubbles?
Day 2 you literally do nothing but check to see if you have any bubbles in your jar. You should see a few floating on top which means fermentation has started. If you don’t see anything, you are okay. It doesn’t mean it didnt work. It could have bubbled while you were sleeping, and then disappeared by the time you checked. So, just leave there for another 24 hours in the warm spot.
You may start to see the “hooch” in your starter on day 2. Moving forward (beginning day 3) you are going to pour this out before feeding your starter – its the dark liquid that typically sits on top of your starter and smells kinda yucky. But, for day 2, just leave it. This is part of the fermentation process.
Day 3: Feed the Beast!
Pour out that hooch! You are also, on this day, going to pour out half of the starter in the ar. Don’t freak out. This is meant to happen. The consistency is going to be stretchy so you might have to use a utensil to do this. You are then going to feed your starter, switching to the white unbleached flour of choice (1/2 cup again) and the 1/4 cup of warm water. You are going to stir until it has the consistency of a yogurt or pancake batter. You are now going to recover with your cheese cloth and let rest another 24 hours.
Days 4-7: Repeat Repeat!
These next days you are going to follow the exact same process as day 3. Pour out half of the starter and the hooch and feed with your unbleached white flour and water mixture, stir, cover and let rest. You should begin to see more bubbles forming each day and it growing/doubling in size.
The science here is not perfect and climate, type of flour, etc. all will change how long this process takes. The average it has taken me is about 8-10 days, so stick to this timeline, could be a day or two on each side to get the perfect consistency. When your starter is ready, it should be fluffy, kind of spongey, and doubled in size. Sometimes, it will even be overflowing over your jar with tons of bubbles and a slight sour smell (not rank, almost pleasant).
Once you get to this status, its ready to bake. Rule of thumb, typically the first few loaves of bread don’t turn out great. They are not the perfect rise or consistency (yet). I say by the third or fourth bread loaf I am really cooking with gas with a new starter. Some people get extra and even give their starter a name. I didn’t, but feel free too – it can be more fun!
Now, the important part for storing long term. Best situation is obviously to keep feeding it daily and baking up a storm. But, hello! Working mom over here with 5 kids in the house right now. Not practical to be Susie homemaker making bread and goodies from scratch on the daily. So, you can refrigerate it with the lid seeled tight. However, you do still have to feed it and pour out the hooch regularly. If you are going to do this, you follow the same steps. If its been longer than 2 days since you have fed it last, follow your same process and pour out half the starter. Let it get back to room temperature on the counter and then feed with your same 1/2 cup flour, 1/4 cup warm water ratio and let rest. You don’t, however, need to wait the whole 24 hours to use. Typically I take out first thing in the morning and do this process so I can use it to bake that afternoon/night, but you can figure this timeline out with trial and error.
If you want to skip this whole recipe, you can also just order King Arthur’s Sourdough starter directly from their website. I have never done this, but I can see how tempting it would be. Have you tried it? How was it? Comment below.
If you like what you’re reading, make sure to subscribe to the blog!
Follow us on Instagram & Pinterest here for more content like this!


